Sketches:
Sketches: Basically I was approached by my brother to do his wedding cake topper...the only stipulation he gave was to have the guy holding the gal, and the rest was left up to my "trusted" intuition. I came up with three ideas that I knew would be fun to create, and something that he and his fiance would enjoy, not only for the wedding, but years to come. After showing him my 3 ideas, he asked, "What about Star Wars?" Quickly drawing up his suggestion (the 4th idea), he immediately approved it. Period. (IF he had to make a second choice, it would've been "film noir.")


Reference:
Reference: With one of the hardest parts of the creation process down (the potent/solid visionary idea), I began working on reference. I took SEVERAL refference photos of my brother and his fiance in the pose, holding objects, dressed up, etc. Then I created a character reference sheet using pages from Andrew Loomis's, "Figure Drawing for all its Worth." (
Link to free copy of the book here) and the photos. I wasn't as thorough/anal with the 3-point-turn-a-round refference sheets as I had been with my
first wedding cake topper, because I wanted the creative freedom with the clay forming process ( as I had enjoyed with
the second cake topper) but I paid for it later.
Process Planning:
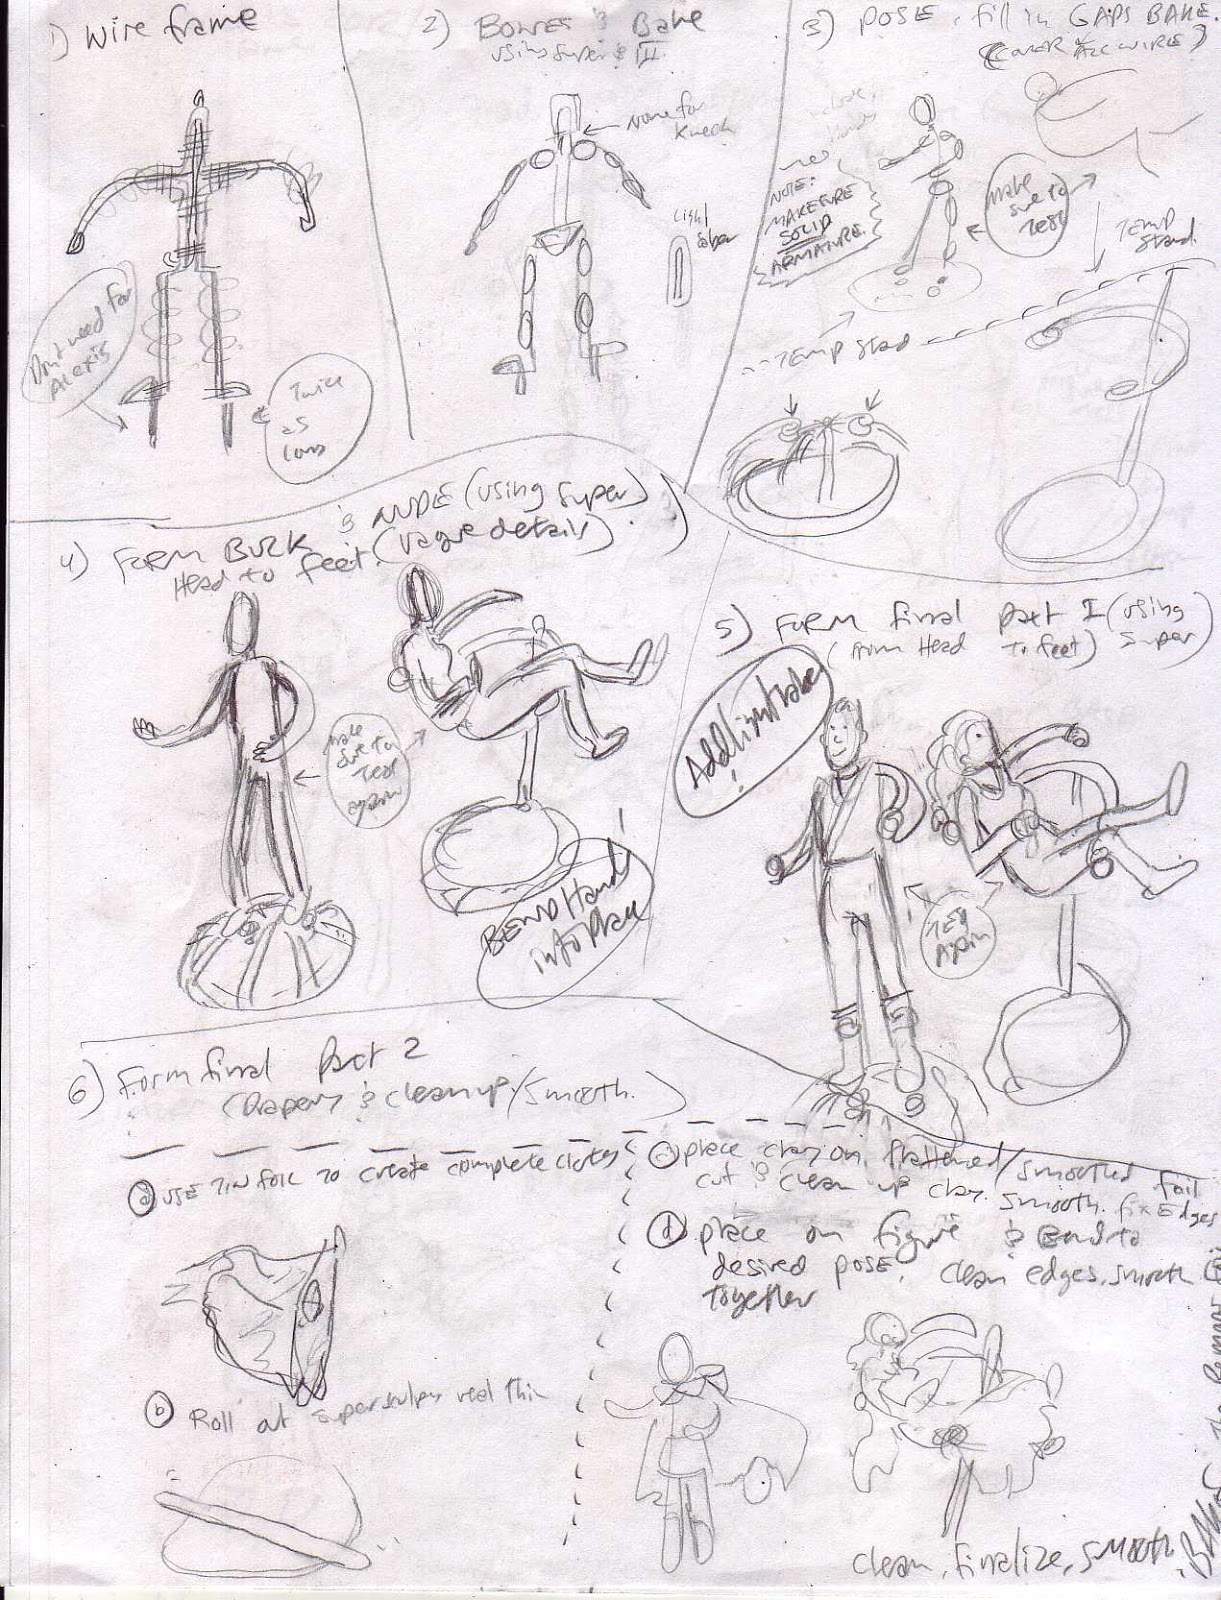
Process Planning: Personally once I figure out EXACTLY how I am going to DO the figure, 1/3 of my work is done. ( 1/3 Pre-figure, 1/3 making the figure, 1/3 painting the figure). SO that is what I am trying to accomplish in this step. I also try to perceive as many problems and solve them before beginning...in order to assure this I also do several actual tests with wire and sculpey. If you actually take the time to look over the sheet below you will notice one major difference between what I had planned for and what happened...I wanted the figures to be separate for the whole process. As I began to add the clay I realized that this was impossible without damaging the figures. One thing I've discovered with art, is that I need to be flexible...so I had to adjust (Even if it meant spending 9,999 extra hours painting in-between all the INS and OUTS of the intertwining figures...Sigh.)
Armature Wire Frame:
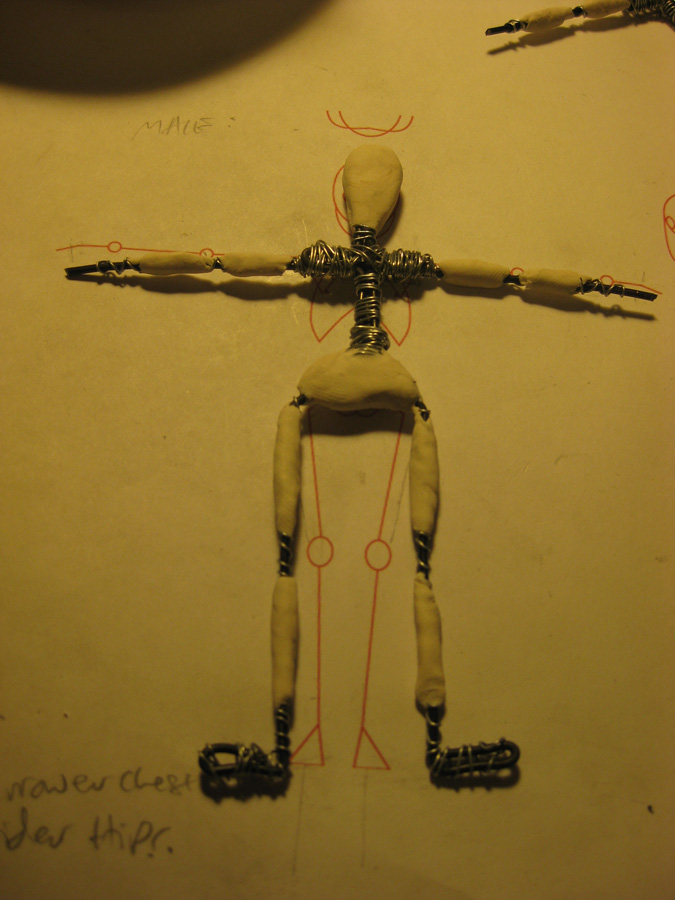
Armature Wire Frame: Remember when I said I would pay for not doing a more detailed reference sheet? I already started to feel the affects. After I did several pre-tests, I realized that I needed a different sheet to refer to than the ones I made...I tried Andrew Loomis pages, but since my characters were cartoony, and Loomis's were beefy, that didn't work. you will notice the print out (
found here) I used for reference. I used 16 Gauge steel and wrapped it with 24 gauge aluminum wire for the armature. This wiring system setup is quite unique, I based it loosely on research of Stop Motion Puppets, past cake toppers I've made and what I knew about the Human body. The only mistake I found after completing the figure was I should've made more support for the male legs. The sculpey cracked at the knees, since the armature was a bit flexible.

The male wire is the one with the prongs out the bottom of the feet. Since the male is the holding the female, it needs something to anchor into the base. You might also notice I wrapped every inch of the black 16 gauge wire withe the 24. This ensures that the sculpey will stick to the armature.
The armature is practically held together by pressure, using the 24 guage wire to keep everything in place. I am very proud of this new development.
Bones and Bake 1:
Bones and Bake 1: Using a 1/2 mixture of Sculpey III and Super Sculpey I lay in the core essential structure of the figure (notice the reference sheet still behind it). Since I use Super Sculpey, I made sure to create a flat paddle as the head, so that I can push, carve, and mold the face without it mushing all over. I then bake the figures in my kitchen oven.
Pose, Fill in the Gaps, Temp Stands, and Bake 2:
Armature Wire Frame: Using a coffee can and more 16 gauge wire I made a temp base for the male figure and a separate for the female (This was back when I was planning on doing them separate). Using my initial sketch, my rough 3 point reference sheet, and the photos I posed the figures.
Once I'm satisfied I set them on their stands and filled in the gaps on the wire (except for the hands. THey are so small, I figured it would be better to do them later). I then bake the figures.
Form in Bulk and 'Nude':
Form in Bulk and 'Nude: This point of the stage I'm really trying to feel the figure out (how things will work or not work based on tests and planning). I start by building the core features of the body (ribcage, pelvis area, and head.) I am using ONLY Super Sculpey at this point, and for the rest of the figure.
Then I start to flesh things out to the point where the bulk of the figure is 'nude'. Then I start to form and create the clothes over the 'nude'. (notice the funny shaped heads. This was also a consequence of not doing detailed reference sheets. Fortunately I was able to use the photos and my knowledge of human anatomy to fix most of the problems later).
Form Final Part 1:
Form Final Part 1: At this point I start to smooth things out and hone in on the deails. Notice I am waiting to do the draping clothes in part 2. I added the lightsaber to the girl.
Form Final Part 2 & Final Bake:
Form Final Part 2: This part is another new development that I came up for this figure (very useful for thin, unsupported billowing clothes)! Using a paper towel I fit each figure for their respective billowing portions. (I used a paper towel because it would not damage the Sculpey, and it was soft and flexible.)
All my Drapery patterns completed
I then lay them out on tinfoil, and cut out the tinfoil.
Making sure the tinfoil is as smooth as possible I lay it onto a rolled out sheet of Super Sculpey, press it into it (until it sticks) and then cut it out.
With the drapery in place (the tinfoil still underneath supporting the sculpey not touching the figure), I added final touches, and then smoothed the whole figure over with Rubbing Alcohol. Below is the completed figure before I baked it. (notice the test head rolling around on the temp base). After saying a silent prayer, stick it in the oven and hold breath for 15 minutes....
Color Reference Sheets:
Color Reference Sheets: With 2/3 rds of the figure process done, I start into the nitty gritty last 1/3. Spending several hours I made color swatch cards, several test paintings of the full figures, tests for my 'texture' based and special effects paints. I even tried to fix the paint with krylon Fixative, to see what it did to my colors (of which I hated the effects and did not use in the end. The Acylic paint M. Graham & Co. was durable enough). Notice the baked figure in the top left of the photo.
Priming:
Priming: Using a mixture of white Gesso (Liquitex), and OPEN Acrylic Medium (Golden) I primed the figure. I start with the huge flat spaces and work towards the smaller planes. I used Open Acrylic Medium to ensure the paint did not dry too fast. In the past I've used actual spray can primer, but hated most the results. This was a good alternative.
Some point during this whole process (after baking the figures), I made a base, and pressed the figures into the soft sculpey and then taking the figures out, I baked the base. In the pictures below EVERYTHING has been primed.
The Final Paint:
The Final Paint: With the priming done, I paint the acrylics on in soft washes using brushes, until happy. (someday I will get an airbrush.) I have to say that painting the figure was a pain, because over 1/2 of it was covered by drapery of some kind, and I had to paint around every imaginable edge, nook and cranny! SO every time I wasn't happy with a color I couldn't just paint it straight, I had to twist and turn the figure in EVERY direction while trying not to touch wet paint...or let the paint dry too fast. X_x
If you recall in the earlier shot of the final base the heart shape was cut out. Using clear hot glue, I attached the heart back to the main base...(you will see why in minute).
Detail shot of the figures.
Special stuff:
Special stuff: If life wasn't complicate enough, doing the figure and all, I had to add Special effects. I bought 5 LED tea-lights and after tearing them apart, glued them in the base of the figure! Since I used clearn hotglue the light shown through where the lightsaber had sliced through the base. Isn't that sweet?! (They were even flickering candles!)
The END